


When you’re on the road with your Brompton Explore, sometimes accidents happen. Before you set out on your journey, make sure to save our field repair guide so you can get right back on your bike and keep the adventure going.
Hub Gear adjustment
Time: 3-5 min
Difficulty: Easy
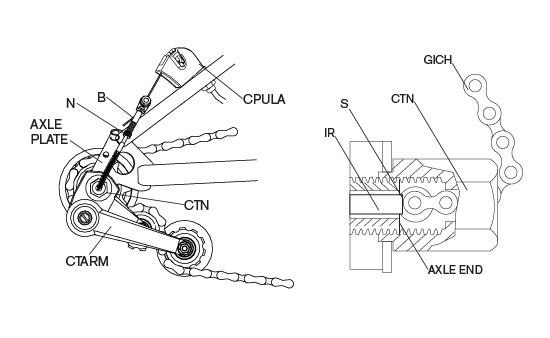
Slacken the lock nut N, turn the barrel B to obtain the correct setting and relock nut N.
Ensure the indicator rod is the correct length for the hub type.
The indicator chain is correctly adjusted when the shoulder S on the indicator rod IR is proud of the axle end by no more than 1mm (this can be seen by looking through the whole in the chain tensioner nut CTN) when the in the middle position on the shifter is selected.
Rear Wheel – removal and refitting
Time: 3-5 min
Difficulty: Easy
When removing the rear wheel it is easiest to do it with the bike in the parked position, with the tire deflated.
Removing the Chain Tensioner
Shift into top gear and pedal a little to engage. On a bike with a Sturmey Archer hub (3 or 6-speed gearing), slacken off the knurled locknut N and unscrew the barrel B.
The indicator chain GICH should be unscrewed and removed.
Move the arm, CTARM, anti-clockwise and lift the chain off; allow the CTARM to move clockwise until it comes to a stop.
Undo the securing nut CTN and remove it and its washer. The chain tensioner assembly may now be removed.
Removing the Wheel
Slacken the wheel nuts, to allow the tab washer to disengage from the axle plate, push the rim from side to side to disengage the tab washer. The wheel can now be removed from the bike.
Fitting the Wheel
Make sure the chain passes around the rear sprocket. Drop the axle into the slots, with the tab washers the correct way around. Make sure that on each side the axle is seated and tighten the wheel nuts to 18Nm.
Fitting the Chain Tensioner
Arrange the chain so that it is running over both the chainring and rear sprocket (on a derailleur, providing high gear is selected, this should be the smaller sprocket).
Address the chain tensioner to the axle plate and press home. Make sure that the idler sprocket lies above the chain & between the “uprights” of the chain-pusher-plate.
Refit the nut CTN/washer and tighten to 5Nm. Refit the indicator chain and adjust as shown opposite.
Using the Toolkit to fix a puncture
Time: 10-30 min
Difficulty: Easy
Take the toolkit out of the front frame, and remove the outer sleeve.
Take the wrench from the toolkit and use the 15mm spanner to undo and remove the rear wheel.
Remove the tire levers, gently press the plastic tab and lift the levers away from the plastic core.
To make the tire easier to remove, push the bead into the center of the rim.
Insert the tire levers into the rim and push down to lever a section of the tire bead above the rim.
Use the hook on the end of one of the levers to hook around a spoke, to keep the lever in place.
With the other lever, work your way around the rim to release the bead.
Push the valve of the inner tube, up into the tire and remove the inner tube from the tire.
Check the inside and outside of the tire for sharp objects that may have pierced the tube.
Inflate the tube to find the puncture, you will be able to hear/feel the air escaping from the hole.
Use the abrasive paper in the toolkit, to roughen the surface of the tube around the hole.
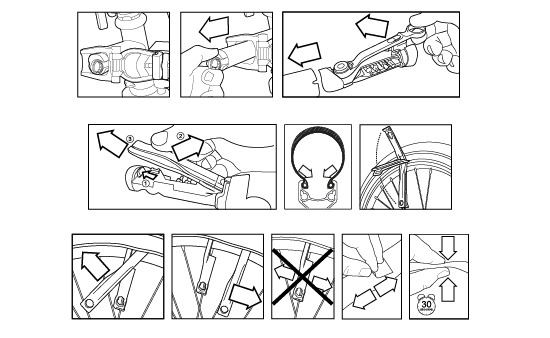
Remove the backing from the adhesive patch and apply it to the tube over the hole.
Apply pressure to the patch for 30 seconds to fix it in place.
Inflate the tube a little, until it holds its shape as this will make it easier to refit.
Align the valve on the inner tube with the corresponding hole in the wheel rim.
Insert the tube into the tire and feed the valve through the valve hole.
Use the tire levers to re-seat the tire bead into the rim, be careful not to pinch the tube.
Inflate the tire.